Azure Bastion

Azure Bastion is a new feature of Azure which allows RDP/SSH connectivity to virtual machines directly in the Azure portal over SSL and without any public IP on your virtual machines.
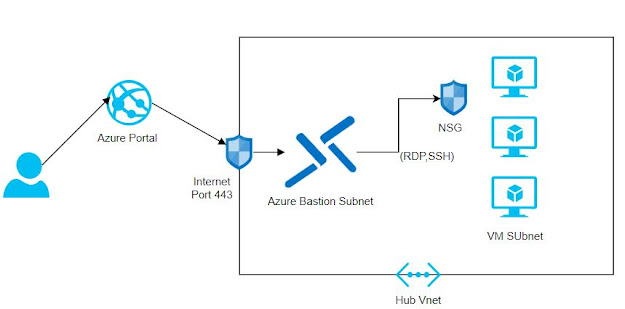


Facts about Bastion:

  • It is a PaaS service which provides RDP/SSH connectivity for VM running in azure using SSL without need of Public IP 
  • Azure Bastion and VM's should be provisioned in same Vnet 
  • Connect to Azure Portal over HTTPS and then select the VM you wanted to access 
  • Azure Bastion has public IP which will be used by Azure management portal to provide RDP/SSH over SSL (443) . We cannot SSH or RDP the Bastion Public IP. 
  • New session in browser open and provides access to VM you wanted to connect. 
  • It is like a gateway that you use to connect the VM using a browser and in return you get RDP/SSH session of the VM
How to Configure Bastion:

Bastion can be configured through Powershell, CLI & GUI. Am using GUI method to create the service. 


Subnet name must be AzureBastionSubnet and it should be in same address space as VM created . I have placed my VM's and Bastion in Linux-Vnet 

Public IP created will be used for SSL connectivity 

How to connect :


Key in the Username and upload the SSH key pair for VM hit connect. VM session opens in the browser. 


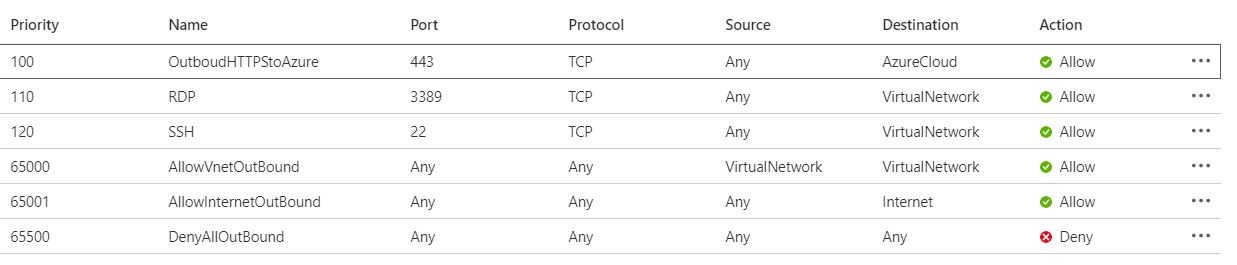
If you like to harden the Bastion with NSG add below Inbound & Outbound rules. 

Inbound Rules:


Outbound Rules:

Source: 

https://docs.microsoft.com/en-us/azure/bastion/bastion-nsg

https://azure.microsoft.com/en-us/blog/announcing-the-preview-of-microsoft-azure-bastion/
Mapping Azure Container Instance (ACI) to Custom Domain

I recently had a requirement to map my Docker Container instance to a custom subdomain. One of the way to achieve this is mapping the Container FQDN with CNAME in Domain register portal. 

What is FQDN - Fully qualified domain name

what is CNAME : A Canonical Name record 

Tomcat container is used in this project to deploy the webapp. The WAR & Dockerfile used in this project is available in Github account Chennaitechie.


I have built the docker image (considering you are aware of how to build docker image) in local desktop now it needs to be pushed into Azure Container Repo. 

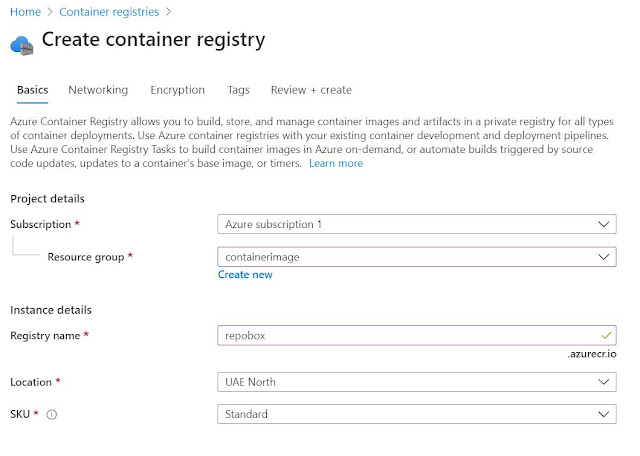
1. Create Azure container registry. Container registry is used as a repo for container images. 

In this project i have name by Registry name as 
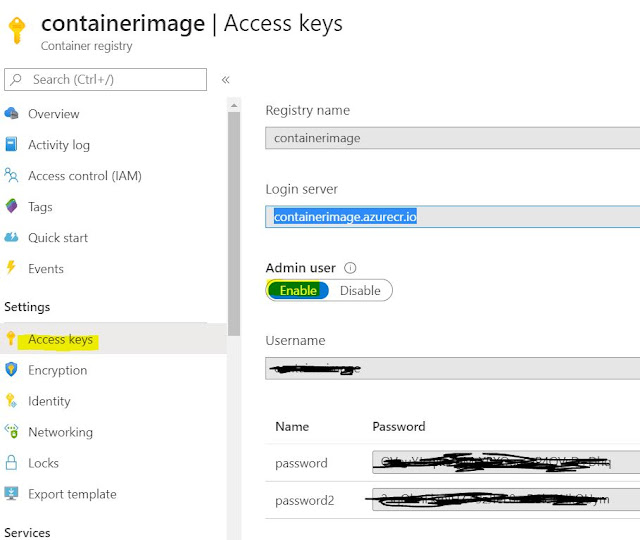
2. Next step is to enable user access for the container registry created . Go to container setting and select access key. 


3. Login into Azure Container Registry , Open power shell and type in the command  docker login "Container Registry Name" in this project my registry name is containerimage.azurecr.io


execute the cmd and you will have an option to key your username and password from access key page.

4. Docker image should be taged prior to pushing the image into azure container repo.Use docker tag to create an alias of the image with the fully qualified path to your registry. I have used namespace webapp to avoid clutter in root of the registry. 

docker tag "local container name" "New tag name" 


5. Now lets push the docker image from your local computer to Azure Container Repo and it is a straight forward approach docker push "container name tag"


 docker image is transferred to azure and it is ready for action. 

6. Select Container instance and add new container to bring up below configuration page. 


Image source is selected as Azure Container Registry which will bring up options to select the registry and images available in the repo 


7. Select network configuration we need to assign DNS name and open port 8080 which will be used by tomcat . 

select Review+Create. Tomcat Container should be up and running copy the dns label name under overview and navigate to port 8080 and the webapp name.


FQDN for this container is tomcat.centralus.azurecontainer.io now contact your domain register to update the CNAME record for your domain or you can do it yourself if you have access to domain management portal. 


CNAME record got activated within less than a hour. Thanks for reading !!!


Custom Domain register using Azure Active Directory

Steps to be followed to add custom domain to Azure.

* Create your domain (www.xyz.com/in) with Domain register (Godaddy/Namespace/Bigrock) 

* Select Azure active directory service 
                                                     
* In this post am using my default AD directory and select custom domain names 


* Select add domain and key in your domain name in the pop on your right side of the screen. 


In this example am adding custom domain azureblog.com 

* Now we need to add the TX or MX record in domain register to verify the domain in azure active directory. 


Open Domain register portal (Godaddy/Bigrock) from where you have registered the Domain and select DNS management you will get an option to add TXT /MX record 

Note: You can keep the Default TTL value in DNS management portal .

It took less than an hour for me to get my domain verified, Therefore make sure your configuration in Domain register is proper. 


How to configure Azure Load Balancer

How to configure Azure Load Balancer (Step by Step by Procedure ) 


  Azure Load Balancer(LB) works in Layer 4 in OSI model (Transport Layer) and acts as a single point of contact for end users. Work of LB is to distribute inbound traffic to the backend instances.


Azure LB is one of the load balancing concept in Azure we will explore APP Gateway, Traffic Manager is upcoming blog post. LB is configured with rules and these rules work at the port level to forward the traffic from source port to destination port .

Azure LB has two configuration mode 

1. Internal load balancing

2. Public load balancing 

Currently we are working on Public LB. In this mode, Load balancer(LB) is assigned with a public IP address to ensure that the LB can accept incoming request from internet and based on the configured rules it will route the incoming traffic over VM in private network. 

Procedure: 

1. I have created two VM's running Tomcat on CentOS. 

both the VM's are in same region and it should be in same network. In this example my 

network address is 172.16.0.0 

subnet for ho-webapp is 172.16.1.0 

subnet for dr-webapp is 172.16.2.0

2. Create Load Balancer , Make sure LB & VM's are in same region. 


3. To put LB into action we need to configure the below. 


Frontend IP Configuration : 

We are configuring Public LB hence Frontend IP address is assigned as shown below. 


Backend Pools: 

Is a set of VM instance or instance in a VM scale set serving incoming request. It is recommended to add more VM workload to serve the incoming traffic effectively. Adding or removing VM instance from Backend Pool and its following configuration/reconfiguration is taken care by Load Balancer . 

we have two VM instance HO-Webapp & DR-Webapp which are in different subnet and under same VNET


Health Probe:

Health probes allow Load Balancer to detect the backend pool instance status. The configuration of the health probe and probe responses determine which backend pool instances will receive new flows When a health probe fails, Load Balancer will stop sending new flows to the respective unhealthy instance. Outbound connectivity is not impacted, only inbound connectivity is impacted. 

Load Balancer health probes originate from the IP address 168.63.129.16 and must not be blocked for probes. what is Probe source IP 


Load Balancing Rules: 

A load balancing rule distributes incoming traffic that is sent to a selected IP address and port combination across a group of backend pool instances. The VM instance that the health probe considers healthy receive new traffic.


Inbound NAT Rules: 

Network address translation (NAT) is a port forwarding technique. We use NAT Rule to forward traffic from a specific port of the front-end IP address to a specific port of a back-end VM.

In the below example i have enabled SSH service in Frontend IP address to access the port 22 in target ho-webapp vm so i can connect the VM from outside network. 

You can also use custom port under service option. 


Search Results

Web result


I have enabled custom port 2222 to access the VM DR-Webapp backend port 22 for SSH. 

With this configuration Azure public loadbalancer is ready for workload. 

Reference document : Azure Load Balancer 


Check if your computer can run a game


It is really annoying for game lovers to buy a game and find it fails to run on their computer. To avoid this it is best to check whether your computer meets the system requirement of the game 

To check the compatibility of the game you can make use of a simple online tool  that can determine if your computer can run a particular game or not 

 Follow the below steps to check:


2. Type the name of the game you like to check 


3.Select begin detection 

4. When prompted run the Java applet 


5.The result will be displayed shortly


Harddrive has less storage than promised


We buy a new harddrive or pen drive and find that it has less storage space than what was mentioned on the box do you know the reason for it if ?


The answer is that the manufacture considers 1 Megabyte to be 1000 Kilobytes, 1 Gigabyte to be 1000 Megabytes, 1 Terabyte to be 1000 Gigabytes and so on. This is correct considering that kilo means 1000 and mega means 1000000 (10^6). However, computers calculate on base 2 and to them, 1 MB is actually 1024 kilobytes, 1GB is 1024MB and 1 TB is 1024GB. This difference in the method of computation is responsible for this "missing space."

Consider a 500 GB harddisk:

From a manufacturer's point of view, the 500GB will have 500*1000*1000*1000 = 500000000000 bytes.

From a computer's point of view, 500GB is actually 500*1024*1024*1024 = 536870912000 bytes.

Hard drive that promises to have 500 GB storage space will actually display 465.66GB, 536870912000-500000000000 = 36870912000 bytes (34.34GB) less storage space when connected to a computer 

100GB hard disk displays 93.13GB when connected to a computer 

250GB displays 232.83GB

500GB displays 465.66GB

1TB displays 931.32GB

2TB displays 1862.64GB

Increase in capacity of storage increase in missing space  


Source:Google


Download Windows 8 ISO file


Windows 8 provides a new graphic user interface– Modern (also called Metro) UI (suitable for phone, tablet, notebook and classic PCs). This interface is characterized by “tiles” which work as links and also as interactive widgets (Store, weather, e-mails). Modern UI is optimized for touch screen, but can be controlled by mouse and keyboard. Windows 8 still offers the classic desktop interface as an option.

Microsoft reworked the booting process, replacing classic BIOS with a new system called UEFI. This provides secure boot, which is protection against viruses.

Windows 8 is lighter than Windows 7 but  it demands more pixels on the screen. The minimum screen resolution for windows 8 is  1366 x 768 pixels, which affects many users laptop and desktop  that have a maximum resolution of 1024 x 600 pixels

Use Windows 8 upgrade assistance tool to check whether your desktop or laptop can install Windows 8  Download

Windows 8 Pro ISO files 

For 32 bit Download

For 64 bit Download


XKY4K-2NRWR-8F6P2-448RF-CRYQH   Windows 8 Pro key to install OS 


Windows 8 Pro activator Download


Note: Use activator at your own risk 


Download Windows 7


In this post you can find the download and activator links for window 7 home, professional and ultimate version in ISO format, use Internet Download manager to download so that you can pause and start the downloads when needed use 7zip or Win.rar to extract the iso file

Windows 7 Home Premium 32 bit Download

Windows 7 Home Premium 64 bit Download

Windows 7 Professional 32 bit  Download

Windows 7 Professional 64 bit Download

Windows 7 Ultimate 32 bit Download

Windows 7 Ultimate 64 bit Download


Windows 7 permanent activator Download


Note: use activator at your own Risk


Check whether your computer is infected

Quick signs to check whether your computer is infected


1. Computers work very slow
 
2. Some of processes in Task Manager use 100% of the CPU

3. Hard drive LED blinks constantly

4. Internet connection is very slow (even if it’s a high speed connection)

5. There are message popups beginning to show up after reboot, or in normal work warning you about something, or they offer you to connect to some suspicious web pages 

6. There are popups in system tray with warnings telling you your computer is infected

7. Desktop background is changed and Display Properties won’t let you change it back

8. Folder Options in Windows Explorer->Tools are no longer accessible

9. Task Manager cannot be started

10. Anti virus is inaccessible and definitions cannot be updated
 
11. Some often used applications cannot be accessed anymore (Windows Explorer, Explorer process, etc).

12. Your browser keeps crashing

Source: Google 

How to enable the F8 key to start Safe Mode in Windows 8

Windows 8 introduced a new boot loader that decreased the time that it takes Windows 8 to start. Unfortunately, in order to do this Microsoft needed to remove the ability to access the Advanced Boot Options screen when you press the F8 key when Windows starts. This meant that there was no easy and quick way to access Safe Mode anymore by simply pressing the F8 key while Windows starts.

In this tutorial you can find how to enable the F8 key to start windows 8 in safe mode 

Follow the steps below:

1. Open CMD(command prompt) with admin privilege Click here to open cmd with administrator privilege

2. When the elevated command prompt is open you will be at the C:\Windows\System32> prompt.
To enable F8 in Windows 8 you need to type the following in the command prompt and then press  the Enter key.

3. bcdedit /set {default} bootmenupolicy legacy

    
Once the command has been enter as shown above, press the Enter key on your keyboard. If you entered the command correctly, Windows will report that the "The operation completed successfully.". You now need to restart your computer for the change to go into effect. With this settings configured, you can now press F8 while Windows 8 starts in order to access Safe Mode and other Advanced Boot options.

If you would like to disable the F8 key and go back to the original Windows 8 setting you can open an elevated command prompt and enter the following command:

bcdedit /set {default} bootmenupolicy standard

Once you enter the above command, press Enter on your keyboard. If you entered the command correctly, Windows will report that the "The operation completed successfully." and you should now restart your computer. The F8 key will now be disabled in Windows 8.


Source: Google 

how to open Command Prompt with admin privilege in Windows 8

Follow the below steps to open the CMD(Command Prompt) with admin Privilege in Windows 8

1. Type cmd in windows search


2. Right click command prompt

3. Select Run as administrator

Cmd is elevated with admin privilege


Hide Files or Folders Using Command Prompt

Using this trick you can hide files and folders and it cannot be viewed by any search options even by "Show All Hidden Files and Folders" option

For example:

You have a folder by the name secret which is been stored in Disk drive D to hide it follow the below commands

    1. Press windowkey+R: Run command dialog box appears.

    2. Now type "cmd" and hit enter.

    3. Type "attrib +s +h D:\Secret" and hit enter.

    4. Folder secret will be hidden 

    5. To view this folder, use the same command but replace '+' with '-'
        (Eg: attrib -s -h D:\Secret )


The User Profile Service failed the logon

It is one of the most common error in windows 7 and windows vista computers and it occurs when you click on  user profile icon 


Cause for error message:

1. The C:\Users\(user-name) user profile folder was manually deleted instead of properly deleting user account through user accounts in the Control Panel. A user profile that is manually deleted does not remove the security identifier (SID) from the profile list in the registry.

2. Occasionally, Windows 7 might not read your user profile correctly, for example, if your antivirus software is scanning your computer while you try to log on. Try restarting your computer and logging on with your user account again to resolve the issue before following the options below


Fix it:

  • Using Registry (Handle Registry with care) and create system restore point before you begin 
  1. Click Start, type regedit in the Search box, and then press ENTER.
  2. In Registry Editor, locate and then click the following registry subkey:
    HKEY_LOCAL_MACHINE\SOFTWARE\Microsoft\Windows NT\CurrentVersion\ProfileList
  3. In the navigation pane, locate the folder that begins with S-1-5 (SID key) followed by a long number.
  4. Click each S-1-5 folder, locate the ProfileImagePath entry in the details pane, and then double-click to make sure that this is the user account profile that has the error.
    2705065
    • If you have two folders starting with S-1-5 followed by some long numbers and one of them ended with .bak, you have to rename the .bak folder. To do this, follow these steps:
      1. Right-click the folder without .bak, and then click Rename. Type .ba, and then press ENTER.
        2493038
      2. Right-click the folder that is named .bak, and then click Rename. Remove .bak at the end of the folder name, and then press ENTER.
        2493039
      3. Right-click the folder that is named .ba, and then click Rename. Change the .ba to .bak at the end of the folder name, and then press ENTER.
        2493040
    • If you have only one folder starting with S-1-5 that is followed by long numbers and ends with .bak. Right-click the folder, and then click Rename. Remove .bak at the end of the folder name, and then press ENTER.
    • If you have two folders starting with S-1-5 followed by some long numbers and one of them ended with .bak, you have to rename the .bak folder. To do this, follow these steps:
      1. Right-click the folder without .bak, and then click Rename. Type .ba, and then press ENTER.
        2493038
      2. Right-click the folder that is named .bak, and then click Rename. Remove .bak at the end of the folder name, and then press ENTER.
        2493039
      3. Right-click the folder that is named .ba, and then click Rename. Change the .ba to .bak at the end of the folder name, and then press ENTER.
        2493040
    • If you have only one folder starting with S-1-5 that is followed by long numbers and ends with .bak. Right-click the folder, and then click Rename. Remove .bak at the end of the folder name, and then press ENTER.
  5. Double-click the folder without .bak in the details pane, double-click RefCount, type 0, and then click OK.
    2493045
  6. Click the folder without .bak, in the details pane, double-click State, type 0, and then click OK.
    2493046
  7. Close Registry Editor.
  8. Restart the computer.
  9. Log on again with your account.
Source: Microsoft